DNS
DNS stands for Domain Name System. Domain Name System is an ordered, structured system used for computers that are linked to the Internet or connected in a private network system. Each participant is supplemented with a domain name that represents a variety of information.
Everywhere, computer systems require numerical IP addresses to function. However, it is obviously very difficult for humans to memorize numerical IP addresses. In layman terms, DNS translates domain names that are easy to remember, into numerical IP addresses for use by the computer systems.
The importance of DNS lies in the fact that it is a directory service for the Internet. Just as a telephone directory translates names of people into their phone numbers, DNS does the same for IP addresses linked with a particular domain name.
By assigning authoritive name servers, Domain Name System allocates the responsibility of assigning domain names. Domain Name System links each domain name with a unique IP address.
What is DNS Server?
A universal collection of DNS Servers is the primary element of Domain Name System or DNS. Any computer that is registered to join a Domain Name System can be called a DNS server.
Special networking software is run by a DNS server which has an IP address or DNS server address that is public. It has a database of names of networks and address for other internet hosts.
Private Network Protocols are used for interconnection between DNS servers. All DNS servers are organised in a hierarchical structure. Root DNS Servers, present at the top of the hierarchy, store the domain names and the IP addresses linked to them. There are about 13 root servers in total, present in United States, Japan, Sweden, Stockholm and United Kingdom. The servers are named from A to M.
Other DNS servers which are lower down the hierarchical order store only partial forms of the database. These are usually owned by Internet Service Providers (ISPs) and by Business firms. Google, for instance, keeps various DNS Servers around the globe that manage google.co.uk, google.com, google.in etc.
Any ISP maintains a DNS Server as a part of setting up Internet Connection. Client/Server setup is used for DNS networking. In case of normal Internet browsing, the internet browser acts as DNS client and the ISP server is the DNS server which accepts therequests.
When a particular request is out of scope of the DNS server’s database, it transforms into a DNS client and requests information from the immediate superior DNS server and so on. When the name and IP address match is found, the control flows through the DNS chain and finally to the client.
Find DNS Configuration
On the home network, Internet Connection setup properties can be used to locate or configure DNS server. Internet Service Providers provide customers with public IP addresses of primary DNS server as well as backup DNS servers. Current IP addresses of DNS Server configuration can be found by:
- Opening TCP/IP connection properties screen in Windows 7 control panel (if it was configured in this method in the first place).
- Command line utilities like ipconfig can be used.
- Home network router configuration screens can also be used for the same.
The technical usability of the core database service is also specified by the Domain Name System. A thorough specification of data communication and structural exchanges used in DNS as a fragment of Internet Protocol Suite is also defined by DNS Protocol. DNS evolved historically from text files that were not ascendable to large or global directories. Since 1980s, thus, DNS is being used widely all over.
A particular element is identified by two names on the internet, a domain name and it’s Internet Protocol Address. The DNS or Domain Name System is what translates the domain name into its corresponding IP address. DNS servers store DNS records corresponding to a domain name. Any queries matched against its database are answered by the DNS server.
Flush or reset DNS
Deleting a browser’s temporary files or cookies may lead to a problem in network configuration. In this case, it is required to flush or reset DNS server configuration. This can be done in the method described as follows:
- Open command prompt as administrator.
- Allow command prompt to make changes to the computer by selecting yes on the prompt.
- Type “ipconfig /flushdns” in the text box and press the enter key.
- Type “ipconfig /registerdns” in the text box and press the enter key.
- Type “ipconfig /release” in the text box and press the enter key.
- Type “ipconfig /renew” in the text box and press the enter key.
- Type “netshwinsock reset” in the text box and press the enter key.
- After the above steps, the computer must be restarted.
How to change DNS Server – Windows 7
People who want to change DNS settings in Windows 7 will find this article very helpful. This method listed below will enable users to override the DNS settings which are sent through DHCP in order to make it suitable for a majority of Windows 7 server users. However, in order to use this method, you are required to log in as administrator.
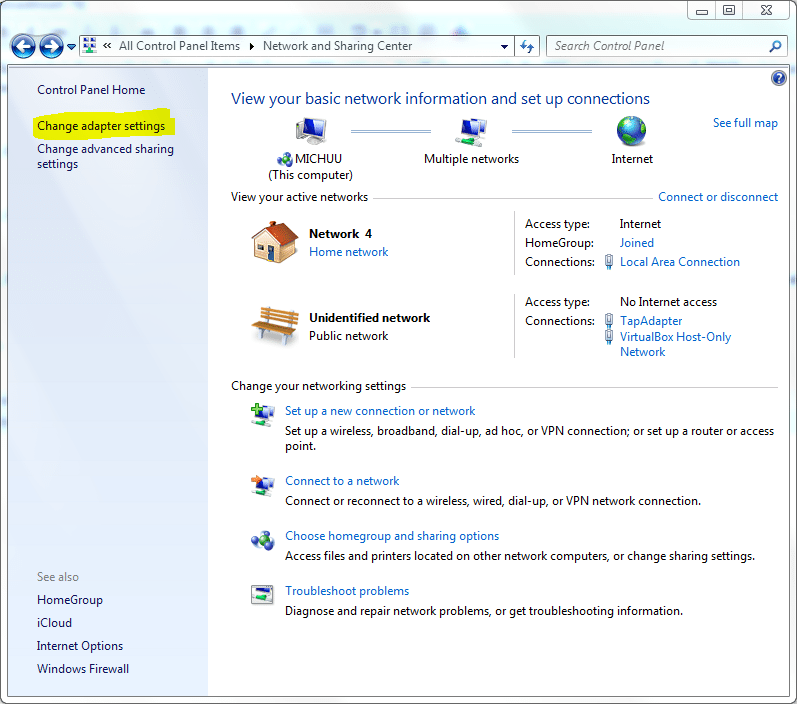
1. Choose and appropriate IP address and open the Network and Sharing Centre from Control Panel.

- In the left pane, click on Change adapter settings.
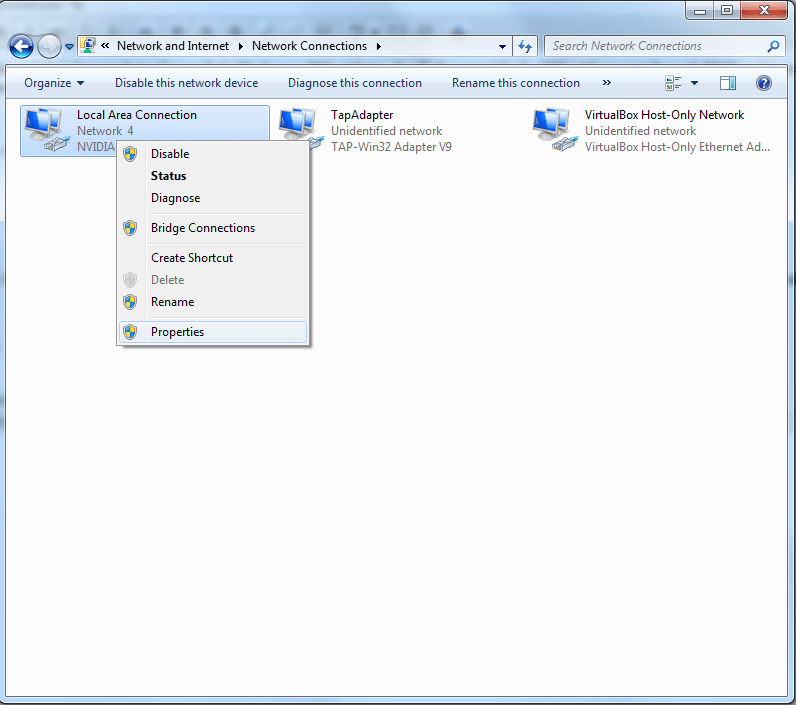
3. Open the properties of the network device that has to be configured by right clicking on its icon in the Network Connections window. In the following picture, it is Local Area Connection. It could be something other than this, like wireless adapter etc. and might have any other name.
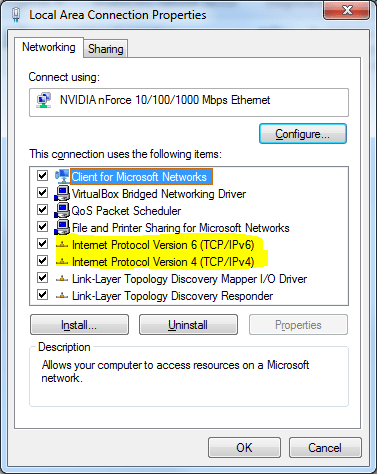
- In the next step, you need to choose the Internet Protocol Version. The following steps are for IPv4. However, the steps are almost similar for IPv6.
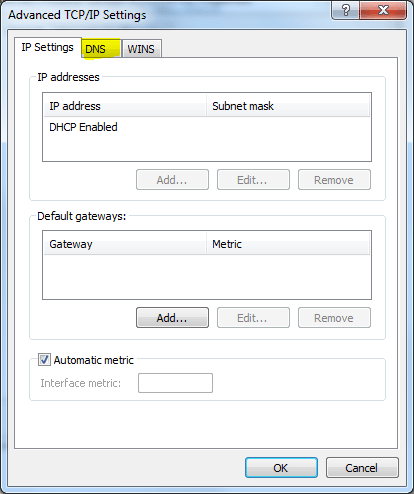
- After opening the Properties windows for IPv4, click on the Advanced tab at the bottom right corner of the pop-up window.
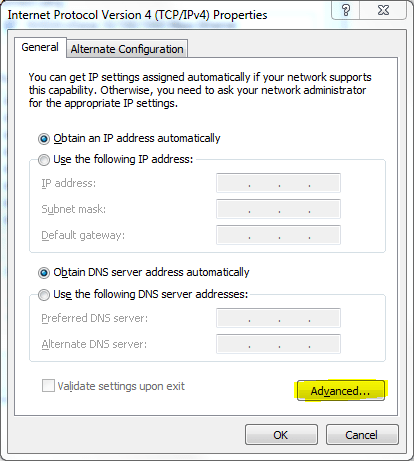
6. “DNS” tab at the top has to be clicked as highlighted.
- Click add after the first white box and type in a Server IP (Tier 2) in the text box which pops up. After you finish typing the IP, click add to add DNS IP address.
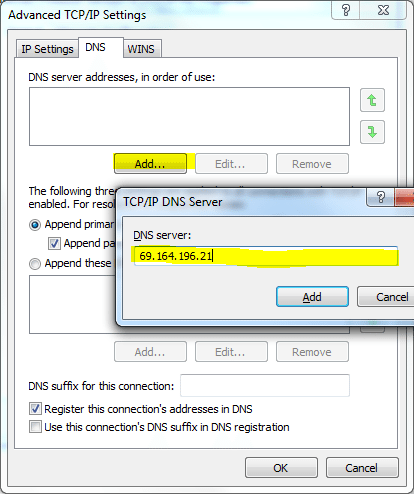
As many DNS servers necessary might be added by repeating this step.
8. Click OK on the remaining of dialogue boxes and you are ready and set up for using OpenNIC.

